How to Downgrade VMware Hardware Version
You’ve upgraded to the latest version of vCenter Server, ESXi, VMware Tools, and either scheduled the VM Hardware upgrade on the next reboot or you’ve manually upgraded the hardware version for each machine. Everything has gone according to plan with no issues during the scheduled maintenance. However, after everything has been done, you find that one of your 3rd party solutions no longer works and you find yourself staring at a list of errors.
In this example, let’s say it’s your disaster recovery (DR) solution that’s not compatible. Don’t worry, I’ll show you a quick way to revert and also point out the way VMware recommends you do it.
As you try to figure out why it’s not working, you quickly go through the logs, and you determine that the VM hardware version that you’re running on-prem is not compatible with your DR solution since they are not running the latest version of vSphere within their datacenter. You do have a few options to rollback and you find VMware KB 1028019, but none of them will work for you. The options located in the KB are:
- Revert to a snapshot. This is the easiest option but assumes you’ve taken a snapshot in the first place.
- User VMware vCenter Converter Standalone. You’ll need to install this tool, but there are limitations since you can only change the VM version to 7, 8, 9, 10, or 11. The other thing is that you need to set up a job for each VM that you need to revert back.
- Create a new virtual machine with the required hardware version and attach the existing disk from the virtual machine. This option can be very time consuming if you have a lot of VMs that need to be reverted back to an older version and prone to mistakes since you have to match up the correct settings for each VM such as vCPU count, memory, number of disks, reservations, etc.
At the bottom of that same KB article, in the “Related Information” section, you’ll find that two other links:
It’s these links that provide another solution to do a VMware hardware compatibility downgrade for your VMs. You can either use the ESXi shell or you can use other tools to do this quicker like in the example I’ll show below using WinSCP and Notepad++.
Revert VM Version
These are the steps to change VMware hardware version compatibility back to a compatible state:
- Take a snapshot of the VM
- Power Off the VM. If you do this on a running VM, you’ll be able to change the value in step 5 below, but the value will revert as soon as your reboot or power on the VM.
- Connect directly to an ESXi host using WinSCP and navigate to the datastore and folder containing your VM
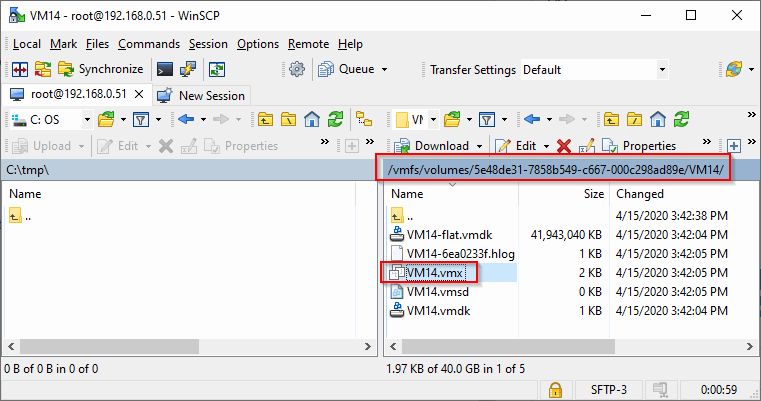
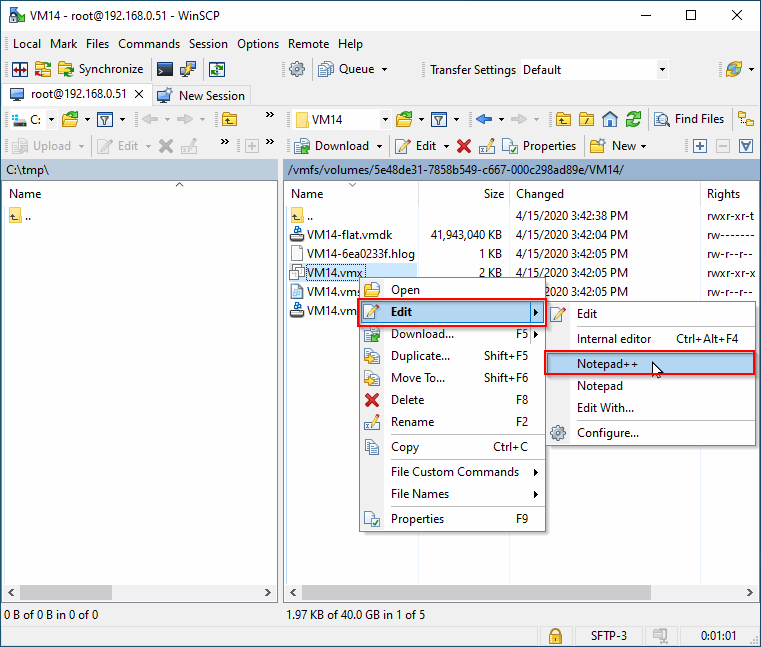
- Right-click the VM’s .vmx file to edit the file. I used Notepad++, but you’re good to use the internal editor.
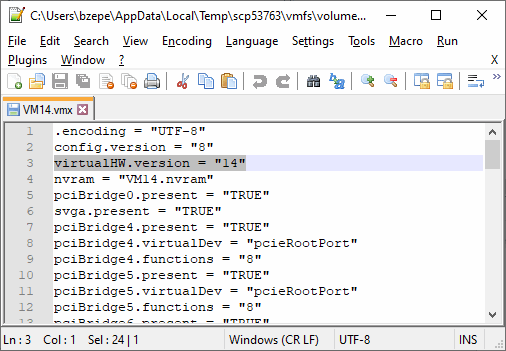
- Modify the VMX file by changing the value to virtualHW.version = “14”, or your desired version. See the table at the end of the article for a range of valid values.
- Power on the VM to see the change.
The table below shows valid values for the VMs I created in my lab but I went only as far back as being compatible with ESXi version 6.0 and greater. If you want a complete listing of version numbers, you can see this KB article 1003746: Virtual machine hardware versions.
I was also curious about the VMDK’s ddb.virtualHWVersion number which shows up in the descriptor file for each virtual disk of each of the VMs I created. From what I can tell, there’s was no change needed, unless of course, you are migrating the VM to an older environment, that is, some other datacenter that is running an older version of vSphere. In that case, I would recommend that you create a VM in your inventory with whatever native hardware version being run and take note of the VMDK’s version number and match it.
While I used WinSCP above, you can also SSH into your server, and use the built-in VI editor to edit the VMX file.
Here are the paths I used to navigate to both the VMX and VMDK files. You’ll need to modify the path for your specific datastores.
Path to VMX file on ESXi Host: /vmfs/volumes/5e48de31-7858b549-c667-000c298ad89e/vmname.vmx Path to VMDK file on ESXi Host: /vmfs/volumes/5e48de31-7858b549-c667-000c298ad89e/vmname.vmdk
| VM Version | VMX File | VMDK File |
|---|---|---|
| 11 | virtualHW.version = “11” | ddb.virtualHWVersion = “14” |
| 13 | virtualHW.version = “13” | ddb.virtualHWVersion = “14” |
| 14 | virtualHW.version = “14” | ddb.virtualHWVersion = “14” |
| 15 | virtualHW.version = “15” | ddb.virtualHWVersion = “14” |
PowerShell
One last thing, I did try to find a PowerShell command to downgrade the version. While there is a built-in command to change the version for a VM, it only works to upgrade to a specific version, not downgrade. Here’s the command:
get-vm vm14 | set-vm -Version v11Here’s the error I saw when I tried to downgrade using PowerShell.
set-vm : 4/17/2020 2:30:01 PM   Set-VM          The operation for the entity "VM14" failed with the following message: "Virtual machine
compatibility is already up-to-date."
At line:1 char:15
+ get-vm vm14 | set-vm -Version v11
+               ~~~~~~~~~~~~~~~~~~~
    + CategoryInfo          : NotSpecified: (:) [Set-VM], AlreadyUpgraded
    + FullyQualifiedErrorId : Client20_TaskServiceImpl_CheckServerSideTaskUpdates_OperationFailed,VMware.VimAutomation.ViCore.Cmdlets.Commands.SetVM
I hope you found this useful on how to change vmware hardware version for your VMs.